
Achieve Stunning Shots in Low Light
- Donovan Evans-Foto Dono

- Sep 12, 2025
- 4 min read
Updated: Sep 14, 2025
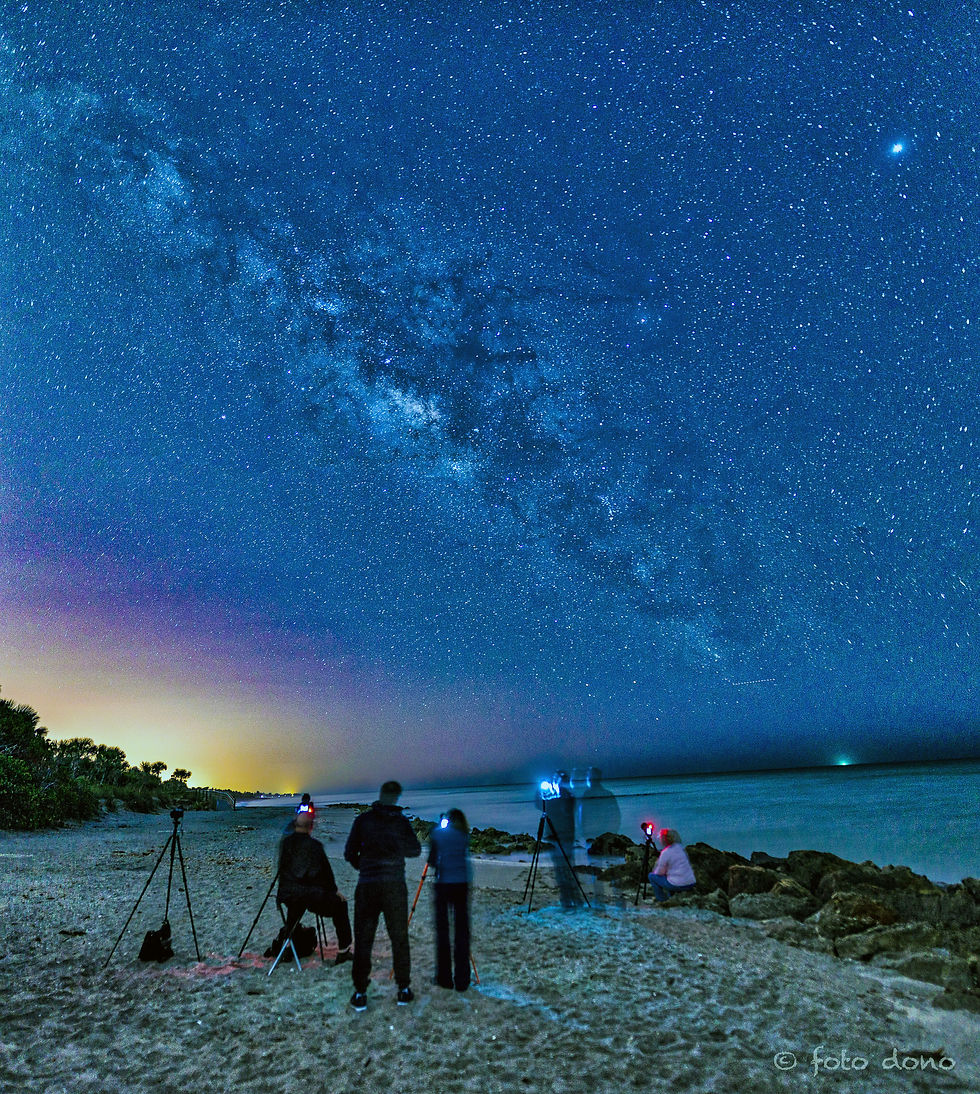
Capturing the beauty of Florida’s landscapes and the mesmerizing Milky Way at night is a passion that drives me every day. The challenge of low-light photography excites me because it pushes the boundaries of creativity and technical skill. Over the years, I’ve honed my craft, producing fine art prints that share a piece of that wonder with others. As the Director of Photo Education at Johnson PhotoImaging, I also find great joy in guiding others through their photographic journeys. Today, I want to share some practical, actionable advice on how to achieve stunning shots in low light using effective low-light photo techniques.
Understanding the Basics of Low-Light Photo Techniques
Low-light photography can seem intimidating at first, but understanding the fundamentals makes a huge difference. The key is to balance exposure, focus, and stability to capture sharp, well-lit images despite limited light.
Use a Wide Aperture: A lens with a wide maximum aperture (like f/1.8 or f/2.8) allows more light to hit the sensor. This is crucial when shooting in dim conditions.
Increase ISO Sensitivity: Raising ISO makes your camera sensor more sensitive to light. However, too high an ISO can introduce noise. Find the sweet spot where your image is bright but still clean.
Slow Down the Shutter Speed: Longer exposures let in more light but require a steady camera to avoid blur. A tripod is essential here.
For example, when photographing the Milky Way over Florida’s coast, I often use a 20-second exposure at f/2.8 and ISO 3200. This combination captures the stars sharply while keeping noise manageable.

Essential Gear for Low Light Photography
Having the right equipment can elevate your low-light photography to the next level. Here’s what I recommend:
Fast Prime Lenses: These lenses have wide apertures and excellent sharpness. A 35mm or 50mm prime lens is versatile for landscapes and night sky shots.
Sturdy Tripod: Stability is non-negotiable. A solid tripod prevents camera shake during long exposures.
Remote Shutter Release or Timer: Pressing the shutter button can cause vibrations. Use a remote or the camera’s timer to avoid this.
Camera with Good High ISO Performance: Modern mirrorless or DSLR cameras handle noise better at high ISO settings.
When I lead workshops, I emphasize the importance of investing in quality gear. It’s not about having the most expensive equipment but choosing tools that suit your style and needs.
Mastering Exposure and Focus in Low Light
Exposure and focus are the pillars of any great photograph, especially in low light. Here’s how to master them:
Manual Mode is Your Friend: Auto modes often struggle in low light. Switching to manual lets you control aperture, shutter speed, and ISO precisely.
Use Live View for Focusing: Autofocus can hunt in the dark. Use your camera’s live view and zoom in on a bright spot to focus manually.
Bracket Your Shots: Take multiple exposures at different settings. This increases your chances of getting the perfect shot and helps with post-processing.
For instance, when shooting a dimly lit landscape, I bracket exposures at 15, 20, and 25 seconds. Later, I blend the best parts in editing to enhance detail and dynamic range.
Creative Techniques to Enhance Low-Light Images
Low light photography is not just technical - it’s an art. Here are some creative techniques to make your images stand out:
Light Painting: Use a flashlight or LED to selectively illuminate parts of your scene during a long exposure.
Silhouettes: Position your subject against a brighter background to create dramatic shapes.
Reflections: Look for water or glass surfaces that reflect ambient light for added depth.
Experimenting with these techniques can transform a simple night shot into a captivating story. I often incorporate light painting in my Florida landscape shoots to highlight unique features like driftwood or palm trees.

Post-Processing Tips for Low Light Photography
Editing is where your vision truly comes to life. Here are some tips to enhance your low-light images:
Noise Reduction: Use software like Adobe Lightroom or Photoshop to reduce noise without losing detail.
Adjust White Balance: Low-light scenes can have color casts. Correcting white balance ensures natural tones.
Enhance Contrast and Clarity: Boosting these settings can make stars pop and textures more defined.
Use Graduated Filters: These help balance exposure between the sky and foreground.
Remember, subtlety is key. Over-editing can make images look unnatural. I always aim to preserve the mood and authenticity of the scene.
Embrace the Challenge and Keep Practicing
Low-light photography is a rewarding challenge that sharpens your skills and expands your creative horizons. Whether you’re capturing the Milky Way or a moody Florida sunset, the proper techniques and mindset make all the difference. If you want to dive deeper, I highly recommend checking out this low-light photography tips resource for more insights and community support.
Keep experimenting, learning, and sharing your work. The night holds endless possibilities for those willing to explore.
I hope these insights inspire you to embrace low-light photography with confidence. Remember, every shot is a step forward on your artistic journey. Happy shooting!

Comments